Remote Control
Contents
Remote Control documentation (as of 9/4/08)
Describing the keys
Hold the remote in your hands as if you're going to kick some Mario Brothers' ass
L1 = left index finger = what we're calling "MODE" below
L2 = left middle finger
R1 = right index finger
R2 = right middle finger
MACRO = labeled "Macro" near your left thumb
Notes
The commands below are generally being sent to just the orb that is associated with the remote the operator is using.
On just about all commands, holding down MACRO makes the command go to all orbs instead of just my orb. For example:
L2 = Stop playing current audio track on my orb
MACRO & L2 = Stop playing current audio track on all orbs
The MACRO and MODE keys should be pressed in combination with other keys as you might use the SHIFT key on a keyboard. You can even use MACRO and MODE at the same time.
Docs
Right Joystick = motion control
up/down = forward back
left/right = steering left/right
Left Joystick = LED control
up/down increase/decrease brightness
left/right cycle through hue
(With MACRO button pressed, light commands are sent to all orbs)
R1 =  Increment Happy Sound n to n+1, Play Happy sound n
R2 =  Increment Angry Sound n to n+1, Play Angry sound n
MODE & R1 = Play Happy sound n (don't increment)
MODE & R2 = Play Angry sound n (don't increment)
Happy sounds are named h000.mp3, h001.mp3... to 15
Angry sounds are named a000.mp3, a001.mp3... to 15
L2 = Stop playing current audio track
MODE & L2 = Turn off all LEDs
MACRO & L2 = "All orbs, play song n".
MACRO & L2 again = "All orbs, stop playing and increment to song n+1"
Songs are named s000N.mp3 --> s007N.mp3, where N is the part per orb.
For example, when the song 4 command is sent, orb 3 will get a play command for file s0043.mp3 and orb 4 will play file s0044.mp3
Right Joystick Button = blink orb lights for identification go into SPU Mode 0
Right Joystick Button & L1 = blink orb lights and go into SPU Mode 1
Right Joystick Button & L2 = blink orb lights and go into SPU Mode 2
Right Joystick Button & L1 & L2 = blink orb lights and go into SPU Mode 3
(this sends "[MODE n]" SPU command, where n is 0, 1, 2, 3 depending on L1 and L2 held down.)
SPU modes have been used to start autonomous programs... #0 = stop autonomous program, #1 = go in a circle, #2 = figure 8.
Left Joystick Button: Emergency stop. Turns off drive and steering motors,
sends "[HALT 0]" SPU command
Performance Notes
For playing songs, if no one else is operating a remote (and generating zigbee packets), when a song is started, all orbs start playing their song in virtually perfect synchrony. If there are other operators, the last orb might be as much as 0.75 second behind the first orb musically.
Zigbee range was tested to be at least 250 yards between remote and in-orb receiver. This test was done at 5:30am in front of Burning Man Center Camp with 1 other orb operating nearby. Line of sight was maintained. The test ended only when the operator (Joey) couldn't see the orb well enough to steer it any more.
Mothernode Remote Control
this is the cordless joystick we have been using with the Mother Node software:
http://www.logitech.com/index.cfm/gaming/pc_gaming/gamepads/devices/287&cl=us,en
it transmits at 2.4 GHz to a receiver which plugs into usb. it seems to have some kind of linux support.
http://www.linuxquestions.org/hcl/showproduct.php?product=2648&cat=all
Using multiples of these is kind of a pain, though supported by PyGame. A powered hub helps on laptops.
Dedicated Remote Control
We are working on a dedicated hardware remote control using XBee Zigbee transmitters built into a gaming remote.
Schematic is on SVN here: http://svn.lee.org/swarm/trunk/pcb/remote/
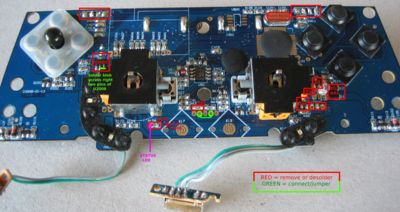
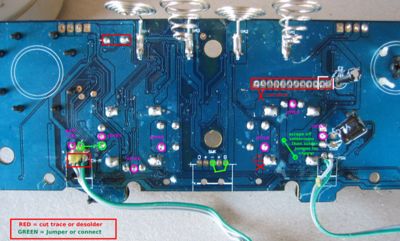
Remotes are based on XGTear Wireless Controllers, gutted with custom electronics installed.
How to prep an Xgear for installing custom electronics:
Take apart, SAVE ALL HARDWARE IN A ZIPLOCK.
Remove circuit board carefully. Prep as follows

